V. Klosek, R. Dakhaloui, L. Vincent, B. Marini et M.H. Mathon
By in-situ neutron scattering, it is possible to characterize the crystallographic texture and to measure strains of the grains of one sample during a mechanical test. Developed around the G5.2 and 6T1 diffractometers of the “Interface et matériaux” team of the LLB, this method, continuously improved, has recently allowed the characterization of 16MND5 steel vessel used for pressurized water nuclear reactors vessels. These data have been central in the validation of a mechanical model taking into account the details of the morphology and crystallography of the grains.
Understanding the macroscopic mechanical properties of polycrystalline materials requires knowledge of the deformation within the grains. Indeed, when a material is subjected to an external macroscopic stress, the deformations of the crystallites depend on their crystallographic orientation and their environment (i.e. of the orientation of neighboring grains, for example). The description of these deformations as a function of crystal orientation of the grains is a primary experimental data to develop really predictive mechanical models.
By in situ neutron diffraction, it is possible to determine the crystallographic texture (i.e. the grain orientation distribution) of a polycrystalline material. This is done in combination with measurements of its elastic strain to analyze the stress field in different families of grains with the same crystallographic orientation, during a mechanical test such as a uniaxial tensile test.
In that aim, a sample (typical size 20x5x5 mm3) is placed in the neutron beam. The grain orientation is measured by scattering within an area of about 5x5x5 mm3. Under stress, each family of grains of given orientation undergoes a particular strain and the displacement of Bragg peaks gives a measurement of the variation of the interatomic distances and thus the deformation. A large number of grains being simultaneously analyzed, the obtained average information is statistically representative and can be directly compared to results of micromechanical models using “mean field” approaches.

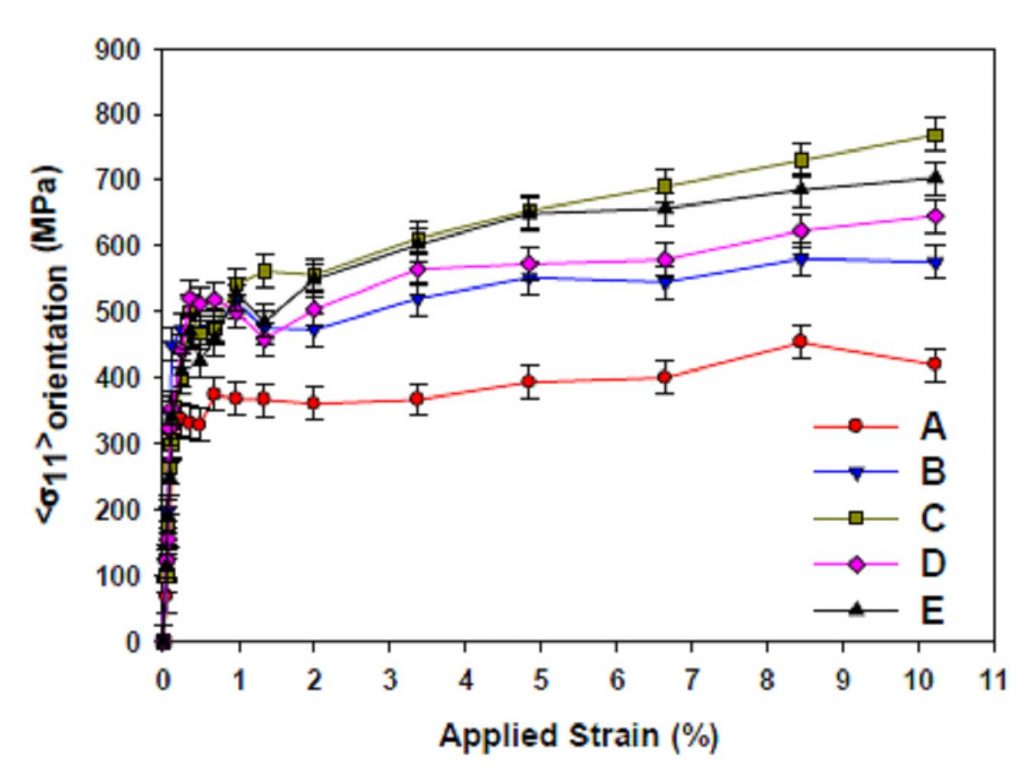
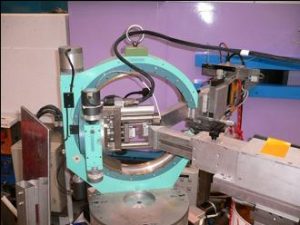
Developed around the DIANE and 6T1 diffractometers of the LLB, this dual approach, continuously improved, has been successfully applied to 16MND5 steel vessels, used for pressurized water reactors vessels [1, 2]. The strain, measured by in situ neutron diffraction during a tensile test (Fig. 1), is very heterogeneous among the five analyzed crystallographic orientations (Fig. 2). These data were central for the validation of a mechanical model developed by the SRMA (Service de Recherches Métallurgiques Appliquées), taking into account the morphology and crystallography of the grains.
References:
[1] Orientation stress field analysis in polycrystalline bcc steel using neutron diffraction
R. Dakhlaoui, V. Klosek, M.H. Mathon, B. Marini, Acta Materialia 58(2) (2010) 499.
[2] R. Dakhlaoui, rapport DEN DMN/SRMA/EC/2008-2973/A (2008).

Contacts: V. Klosek1, R. Dakhaloui2, L. Vincent2, B. Marini2, M.H. Mathon1
1 CEA – CNRS, IRAMIS, Laboratoire Léon Brillouin, 91191 Gif-sur-Yvette Cedex
2 CEA, DEN-DANS/Département des Matériaux, SRMA, 91191 Gif-sur-Yvette Cedex


